Notarization for macOS installers is a security measure implemented by Apple to verify the legitimacy and safety of software distributed outside the Mac App Store. It essentially gives users more confidence that the app they’re about to install hasn’t been tampered with and is free from malware.
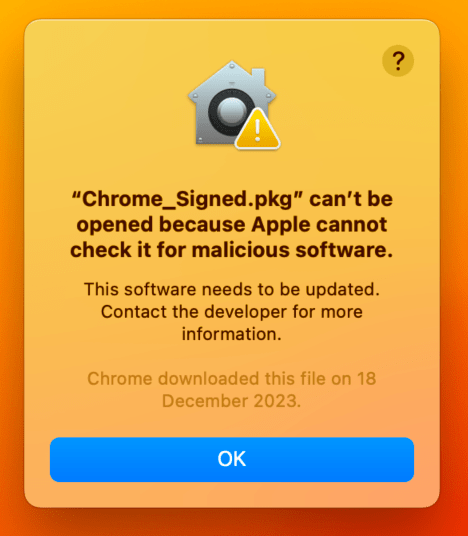
From a packaging perspective, notarization is necessary if the end customer intends to allow users to install packages created by Apptimized manually. If the package has been notarized, users won’t encounter any warnings or need to approve the installation through the “Security” tab in the macOS system.
Example of a warning that appears when launching a .pkg installer without notarization:
How it works
- The developer submits the installer package or disk image to Apple.
- Apple scans the package for malicious code and suspicious content.
- If the scan passes, Apple issues a “ticket” that verifies the app’s legitimacy.
- When users try to install the notarized app, Gatekeeper (macOS’s built-in security system) checks for the ticket.
- If the ticket is present and valid, Gatekeeper allows the installation to proceed without warnings.
What is needed for the notarization process?
- An active subscription for the Apple Developer Program (https://developer.apple.com/).
- Latest Xcode. The minimum requirement is Xcode 14 (could be downloaded from the App Store).
- Generated an app-specific password (https://support.apple.com/en-us/102654).
Let’s take a deeper look at the notarization process.
First, a package installer should be signed. To obtain the necessary certificate, it is needed to enroll in the Apple Developer Program and to download it from the admin portal. The specific certificate required is the “Developer ID Installer”.
Command for signing the installer is:
productsign –sign “Developer ID Installer: Company Name XXXXXXX” ./Chrome.pkg ./Chrome_Signed.pkg
To verify that installer is signed, users may use the next command:
pkgutil –check-signature /PathToTheFile/Chrome_Signed.pkg
How to notarize installer?
The Apple notary service will no longer accept uploads from Xcode 13 or earlier or from altool as of November 1, 2023. Users must switch to the notarytool command-line utility or update to Xcode 14 or later if they notarize their Mac software with the Apple notary service using the altool command-line utility or Xcode 13 or earlier.
This is how the notarization command will appear:
xcrun notarytool submit /PathToTheFile/Chrome_Signed.pkg –apple-id <apple-account-email> –team-id <teamid> –password <password> –verbose
- <apple-account-email> – the Apple ID login username you use with Developer ID services.
- <teamid> – Team ID, that could be found at https://developer.apple.com/account#MembershipDetailsCard
- <password> – App-Specific Password, created here – https://appleid.apple.com/account/manage
For checking notarization status, here is the following command:
xcrun notarytool info <UUID> –apple-id <apple-account-email> –team-id <teamid> –password <password>
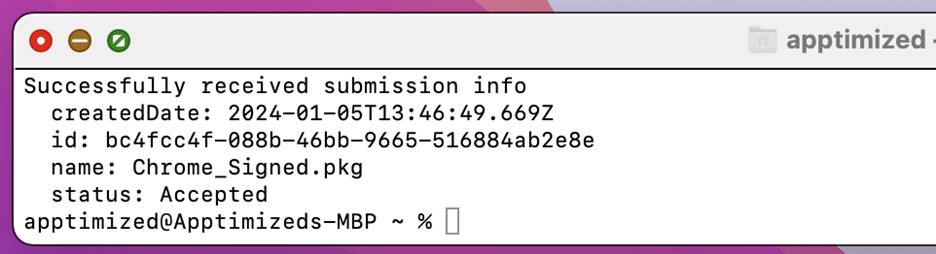
- UUID is a 36-character string that uniquely identifies a specific notarization request. Users can get it at the notarization request. Example of UUID (id value from the screenshot):

- The values for <apple-account-email>, <teamid> and <password> will be the same as those used in the submit command.
The output of the command should look like this in case of successful notarization:
The next step is stapling. Stapling refers to the process of associating the notarization information with the application or installer package. After an application or installer has been notarized by Apple, stapling is an additional step that “attaches” the notarization ticket to the software package.
Command for stapling is:
xcrun stapler staple /PathToTheFile/Chrome_Signed.pkg
The result of command execution should be the message: “The staple and validate action worked!”
And that’s all the required actions! The installer has been successfully notarized and stapled, so it’s ready to be installed manually without any issues on any machine.
Please get in touch with our Support team if you have any questions or if you need assistance or Schedule a Demo with our experts.
Go to the Apptimized platform to make a package request. Select the necessary priority and, if you have one, provide a reference for a packaging expert.